How to Make Herbal Ointment for Skin Healing
- Sunny

- 6 days ago
- 7 min read
A herbal ointment is a topical preparation made by combining herb-infused carrier oils with a natural wax, typically beeswax, to create a semi-solid balm that supports skin healing and tissue recovery. Learning how to make herbal ointment at home gives you full control over every ingredient, from the herbs you choose to the oils you use as a base. Plant-based ointments support natural skin repair while minimizing the toxicity risks associated with synthetic alternatives. This guide walks you through ingredients, infusion methods, blending steps, and safe application practices so you can make an effective DIY herbal salve from scratch.
What ingredients and tools do you need to make herbal ointments?
A basic herbal salve requires two core components: an herb-infused carrier oil and a wax solidifier. Beeswax provides stability and texture, making it the preferred wax for most homemade herbal remedies. The standard starting ratio is 1 part beeswax by weight to 4–5 parts infused oil by volume, which equals roughly 1/4 cup beeswax per 1 cup of oil.
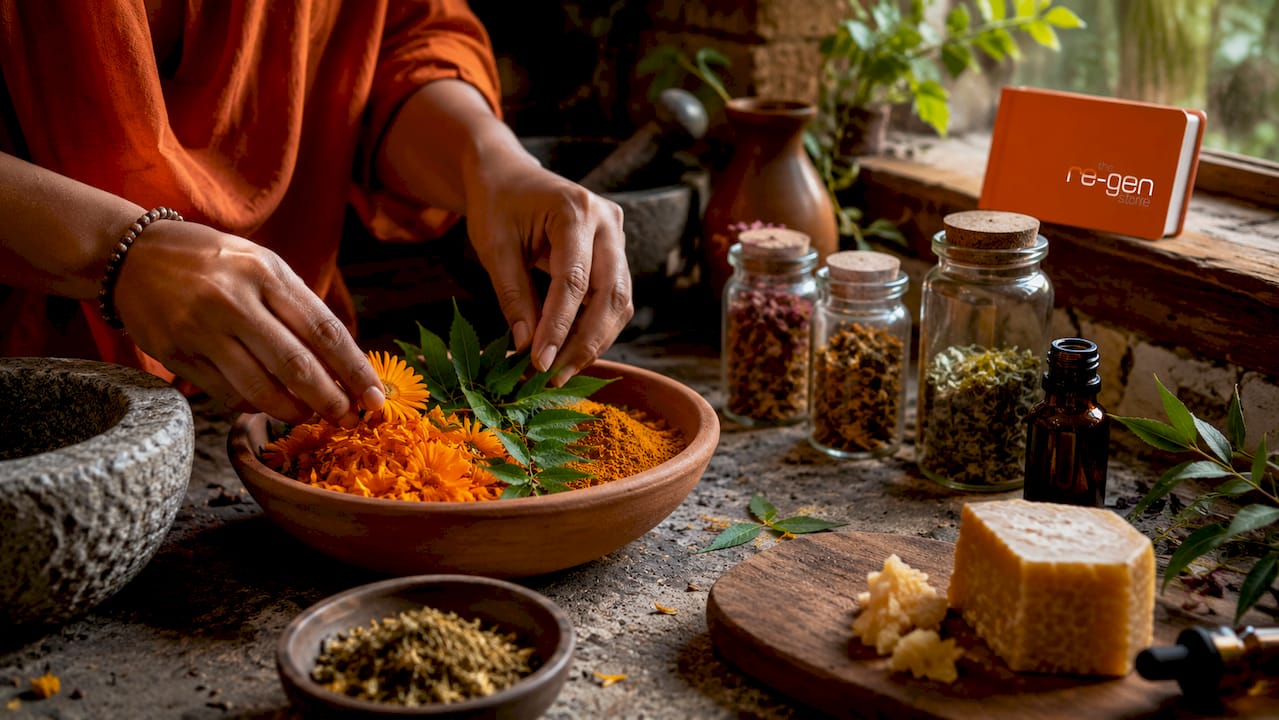
Herbs to use
The herbs you select determine the therapeutic value of your ointment. Turmeric, neem, and calendula deliver anti-inflammatory, antimicrobial, and antioxidant effects that directly support skin healing. Chamomile soothes irritation, while calendula accelerates tissue repair. You can explore herbal blends for skin wellness to understand how these botanicals interact and complement each other.
Carrier oils and wax options
Ingredient | Best For | Notes |
Olive oil | Dry or mature skin | Rich in oleic acid; slow to absorb |
Coconut oil | Antimicrobial support | Solid at room temperature; adds firmness |
Sweet almond oil | Sensitive skin | Light texture; good for facial use |
Beeswax | Solidifying base | Most stable; preferred for beginners |
Shea butter | Emollient and repair | Adds creaminess; slightly softens set |
Natural bases like beeswax and shea butter help phytochemicals penetrate the skin and enhance repair. Each oil brings its own benefit, so your choice should match the skin concern you are addressing.
Tools you need
Double boiler or a heat-safe glass bowl set over a pot of water
Kitchen scale for measuring beeswax by weight
Glass measuring cup for oils
Wooden spoon or silicone spatula for stirring
Small glass jars or tins for storage
Thermometer (optional but helpful)
Pro Tip: Use a dedicated set of tools for ointment making. Beeswax is difficult to clean from cookware, so keeping a separate pot and spoon saves time and frustration.
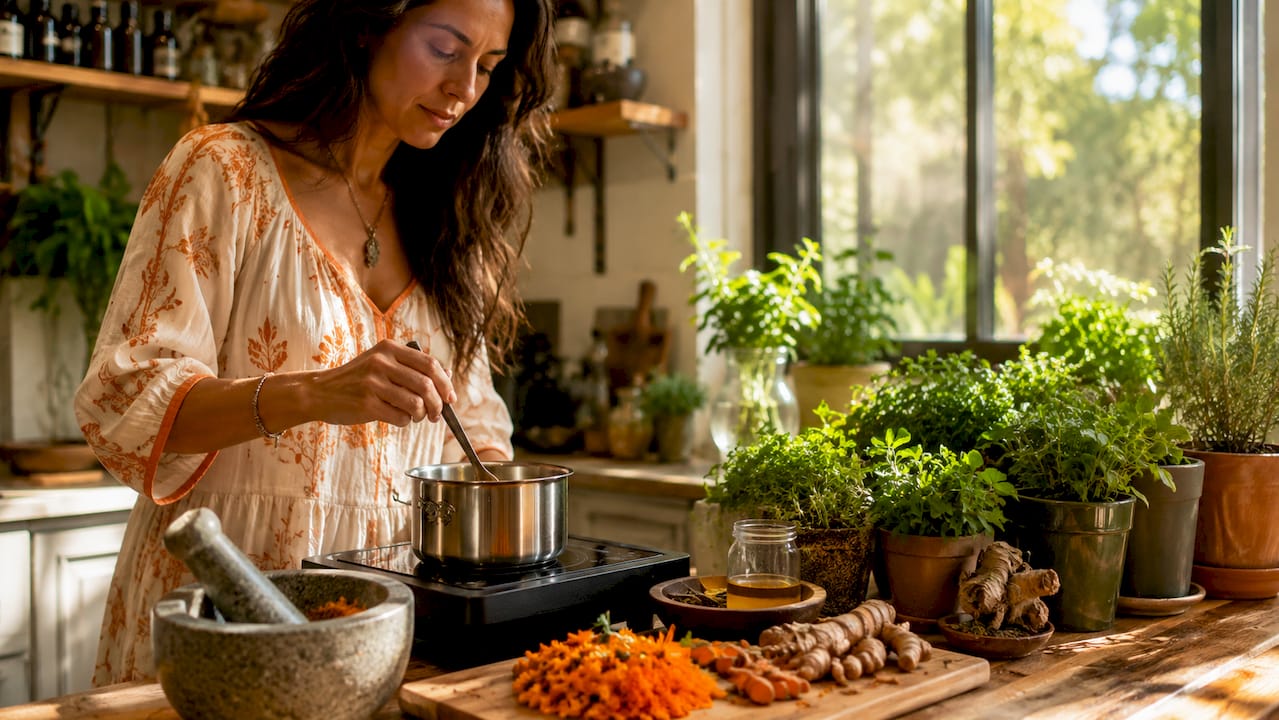
How do you prepare herbal infused oils safely?
Infused oil is the foundation of any herbal ointment recipe. You extract the active compounds from dried herbs into a carrier oil, then use that oil as your ointment base. Heat infusion takes 2–12 hours and is recommended for beginners because it reduces mold risk. Cold infusion takes 2–6 weeks and requires more patience and careful moisture management.
Step-by-step heat infusion method
Dry your herbs fully. Fresh herbs contain moisture that causes mold. Wilt them for 1–2 days on a clean surface before use.
Fill a glass jar loosely with your dried herb of choice, such as calendula flowers or chamomile.
Pour your carrier oil over the herbs until fully submerged, leaving about an inch of headspace.
Place the jar in a double boiler or slow cooker set to low heat (95–110°F).
Infuse for 2–8 hours, stirring occasionally. The oil will deepen in color as it absorbs the plant compounds.
Strain through cheesecloth into a clean, dry glass jar. Press the herbs firmly to extract all the oil.
Label the jar with the herb name and date. Infused oils typically last 6–12 months when stored in a cool, dark place.
Pro Tip: Keep every container completely dry before adding oil or ointment. Even a few drops of water introduce bacteria and mold that will ruin your batch.
Moisture is the primary enemy of DIY salves, causing rancidity and microbial growth. This single rule prevents most beginner failures.
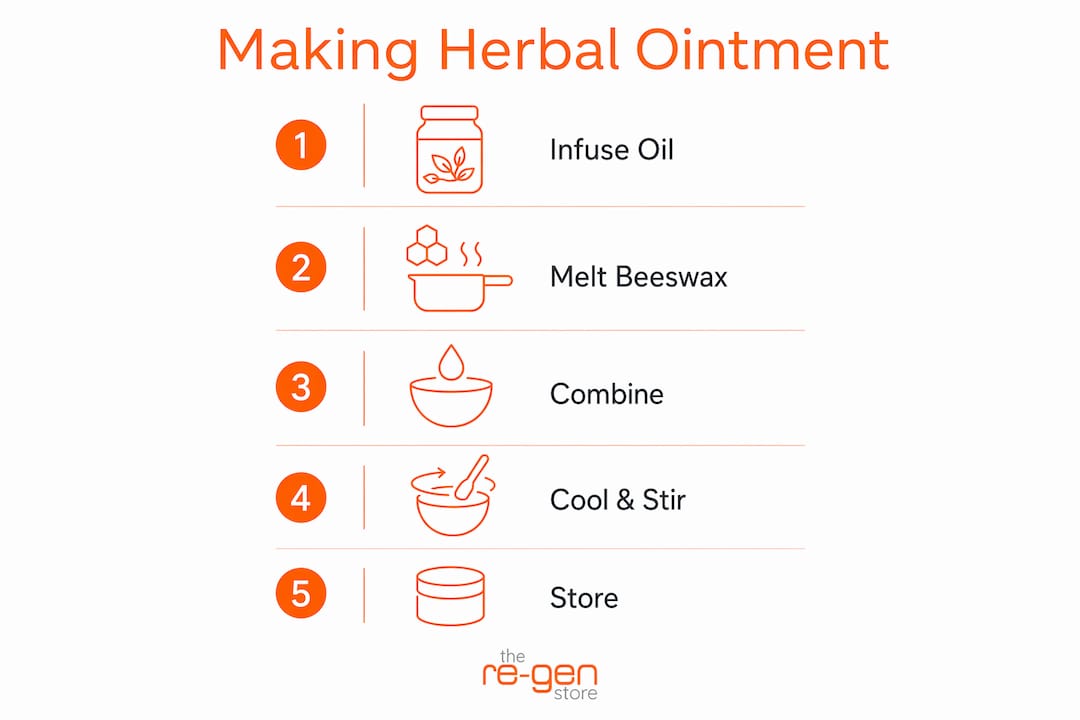
How to make the herbal ointment: step-by-step process
Once your infused oil is ready, making the ointment itself takes about 20 minutes. The process uses controlled heat to melt beeswax into the oil, then allows the mixture to cool into a stable, spreadable balm.
Measure your ingredients. Use 1/4 cup beeswax pellets per 1 cup of infused oil as your starting point.
Melt the beeswax gently in a double boiler over low heat. Avoid direct heat, which degrades plant compounds and can scorch the wax.
Add the infused oil to the melted beeswax and stir until fully combined.
Run a freezer test. Pour 1 tablespoon of the mixture onto a spoon and place it in the freezer for 2 minutes. If the result is too soft, add more beeswax; if too hard, add more oil. This step saves your entire batch.
Add optional ingredients once the mixture is off heat but still liquid. Vitamin E oil extends shelf life. Essential oils like lavender or tea tree add therapeutic value. Use 10–15 drops of essential oil per cup of base.
Pour into clean, dry jars immediately. Work quickly because the mixture sets fast.
Leave jars uncovered until the ointment is fully set. Covering too early traps condensation and introduces moisture.
Consistency and storage reference
Texture Result | Cause | Fix |
Too soft | Not enough beeswax | Add beeswax in small increments |
Too hard | Too much beeswax | Add more infused oil |
Grainy or separated | Overheated or cooled too fast | Remelt slowly and stir constantly |
Cloudy or discolored | Moisture contamination | Discard and restart with dry tools |
Controlled-temperature fusion followed by gradual cooling with stirring maintains the integrity of plant compounds and produces a smooth, consistent texture.
Pro Tip: Store finished ointments in small, dark glass jars away from heat and sunlight. Smaller containers mean less air exposure each time you open them, which extends shelf life significantly.
How and why should you apply herbal ointments safely?
Applying a natural skin ointment correctly determines how much benefit you actually get. Safe application starts before you ever open the jar.
Patch test first. Apply a small amount to the inside of your wrist or elbow. Wait 24 hours and check for redness, itching, or swelling. Patch testing before widespread use is the standard precaution for any new topical product, natural or synthetic.
Apply to clean skin. Gently cleanse the area before applying the ointment to maximize absorption and reduce infection risk.
Use a thin layer. Ointments are occlusive, meaning they seal the skin surface. A thin coat is more effective than a thick one.
Frequency depends on the concern. For dry skin, once daily is usually enough. For minor cuts or inflammation, two to three applications per day supports faster recovery.
Avoid use during pregnancy without consulting a healthcare provider. Herbs like turmeric and certain essential oils carry contraindications for pregnant individuals.
Consult a healthcare professional for wounds that show signs of infection, do not improve within a few days, or involve deep tissue damage.
Examples of herbal ointments suited to specific concerns include calendula salve for minor wounds and dry skin, turmeric-based balm for inflammation, and chamomile ointment for sensitive or reactive skin. Understanding the role of ointments in injury recovery helps you match the right formula to the right condition.
Key Takeaways
Making an effective herbal ointment requires quality herbs, dry tools, a correct beeswax-to-oil ratio, and a freezer test to confirm texture before the batch sets.
Point | Details |
Core ratio | Use 1 part beeswax to 4–5 parts infused oil by weight and volume. |
Infusion method | Heat infusion (2–12 hours) is safer and faster for beginners than cold infusion. |
Moisture control | All herbs and tools must be completely dry to prevent mold and rancidity. |
Texture testing | Freeze a tablespoon of the mixture to check consistency before pouring the full batch. |
Safe application | Always patch test and consult a healthcare provider for sensitive conditions or pregnancy. |
Why ingredient quality makes or breaks your homemade salve
After years of working with plant-based remedies, the single biggest mistake I see beginners make is treating ingredient quality as optional. You can follow every step perfectly and still end up with a weak, unstable ointment if your herbs are old, improperly dried, or sourced from low-quality suppliers.
The quality and preparation of raw herbal materials directly influence ointment potency and stability. That is not a minor detail. Turmeric’s active compound, curcumin, inhibits bacteria, fungi, and some viruses when it is bioavailable. Degraded or poorly stored turmeric delivers almost none of that benefit.
My honest advice: buy dried herbs from reputable herbal suppliers, not the spice aisle. Store them in airtight containers away from light. And do not skip the patch test just because something is “natural.” Natural ingredients are powerful precisely because they are biologically active, and that means they can cause reactions in sensitive individuals. Respect the process, source well, and your results will reflect it.
— Kyle
Ready-made plant-based ointments worth knowing about
DIY salves are deeply satisfying to make, and they work well for everyday skin care. But for wound care, post-surgical recovery, or more serious skin concerns, a professionally formulated plant-based ointment offers consistent potency and tested stability.
Theregenstore offers Re-gen, a plant-based regenerative ointment formulated to support skin, soft tissue, and muscle recovery without synthetic chemicals or petroleum. It serves as a direct alternative to conventional antibiotic ointments like Neosporin, and it is safe for both people and pets. If you want the benefits of herbal healing without the preparation time, Re-gen is a practical, ready-to-use option. You can also explore Theregenstore’s petroleum-free wound treatment options for cuts, burns, and post-operative care.
FAQ
What is a herbal ointment made of?
A herbal ointment is made from herb-infused carrier oil combined with a wax, typically beeswax, to create a semi-solid topical preparation. Common herbs include calendula, chamomile, and turmeric, each chosen for specific skin benefits.
How long does a DIY herbal salve last?
A properly made herbal salve stored in a cool, dark place typically lasts 6–12 months. Adding vitamin E oil at the blending stage extends shelf life by slowing oxidation.
Can I use fresh herbs to make herbal ointments?
Fresh herbs should be wilted for 1–2 days before use to remove moisture. Skipping this step introduces water into the oil, which causes mold and ruins the batch.
How do I know if my ointment has the right consistency?
Pour one tablespoon of the melted mixture onto a spoon and freeze it for two minutes. If it is too soft, add more beeswax; if too hard, add more infused oil before pouring the full batch.
Are herbal ointments safe for all skin types?
Most herbal ointments are well-tolerated, but patch testing on a small area of skin before full application is the standard safety step. People who are pregnant or managing specific health conditions should consult a healthcare provider before use.
Recommended
Comments